Getting Started with GitHub Pages
Background
When I decided that I wanted to start publicly sharing several years’ worth of notes and reminders that I’ve had stored away in OneNote, I looked at a couple of hosting options.
My main criteria was to have something where I have full control over the content and can freely post items between a few lines long and multi-part articles, as and when I want. I also wanted to be able to write my posts in Markdown and be able to push content changes from GitHub, especially as this fits with the DevOps/GitOps methods that much of my current work uses.
After looking at a few options such as Drupal, Ghost and other open-source platforms I could self host (incurring expense and security headaches no doubt!), I decided to use Jekyll on GitHub Pages. This has the following advantages:
- It’s free, save for registering a custom domain name if I choose to
- It’s simple to set up and can mostly be done through code files pushed to GitHub (IaC for the win!)
- It’s fairly easy to maintain
- It’s fairly easy to customise, though a number of pretty good themes already exist too
So what is GitHub Pages?
Being very brief, it is a static site hosting service that takes web files (html, css etc) straight from a specific repository on GitHub, optionally runs the files through a build process, and publishes them as a standalone website.
Each GiHub repository can have one accompanying Pages site, and you can have a user site (username.github.io) and a project site (username.github.io/projectname) for each repository you own.
Jekyll can be used to generate the site content, and there are a number of themes available to use.
You can see more at https://pages.github.com/.
Getting Started
To set up a default Pages site, you just need to perform the following steps:
- Create a new repository on GitHub
- Name it username.github.io, where username is your GitHub username
- Clone the repository to your local machine
- Create an index.html file in the repository
- Push the changes to GitHub
- Visit https://username.github.io in your browser to view the basic content
Note: See the post GitHub Hints and Tips for help getting started with Git.
I decided I wanted to make a slightly more complex blog-format site, so I chose to use Jekyll to generate the content, and I used the steps below to set up my site.
1. Create New GitHub Account and Repository
I decided to create a new GitHub account purely to host the blog content, to which I added a repository with the slightly odd-looking name cloud17blog.github.io.
2. Clone Repository to Local Machine
I cloned this repository to a new repository directory on my local machine, ignoring the “empty repo” warning:
git clone git@github.com:cloud17blog/cloud17blog.github.io.git
3. Install Jekyll
I then installed Jekyll on my local machine (Linux Ubuntu 2022 on WSL). Initially I followed the instructions at https://jekyllrb.com/docs/installation/, but subsequent attempts to install it this way failed with dependency errors.
I found the most reliable method was to install Ruby via a Ruby version manager (RVM or rbenv) and then to install Jekyll via RubyGems (which is used to build the site pages and run a local web server to test them with).
1. Install Ruby using rbenv
Update packages and install dependencies:
sudo apt update
sudo apt install libssl-dev libreadline-dev zlib1g-dev autoconf bison build-essential libyaml-dev libreadline-dev libncurses5-dev libffi-dev libgdbm-dev
Download and install rbenv:
curl -fsSL https://github.com/rbenv/rbenv-installer/raw/HEAD/bin/rbenv-installer | bash
Add rbenv to the PATH and initialise it:
echo 'export PATH="$HOME/.rbenv/bin:$PATH"' >> ~/.bashrc
echo 'eval "$(rbenv init -)"' >> ~/.bashrc
source ~/.bashrc
Check the installation:
type rbenv
Install nodejs:
curl -sL https://deb.nodesource.com/setup_18.x -o nodesource_setup.sh
cat nodesource_setup.sh
sudo bash nodesource_setup.sh
sudo apt install nodejs
node -v
Find what versions of Ruby are available, install the latest version (3.3.1 at time of writing), and make it the default version:
rbenv install -l
rbenv install 3.3.1
rbenv global 3.3.1
ruby -v
gem -v
2. Install Jekyll and Bundler
# Install development tools:
sudo apt install build-essential

# Install Jekyll and Bundler as Ruby Gems:
gem install jekyll bundler

# Check installation
jekyll --version
jekyll 4.3.3
3. Create Jekyll Site
Once I’d got this done correctly, I created a new Jekyll site in the repository directory, using --force option to ignore existing files:
cd cloud17blog.github.io
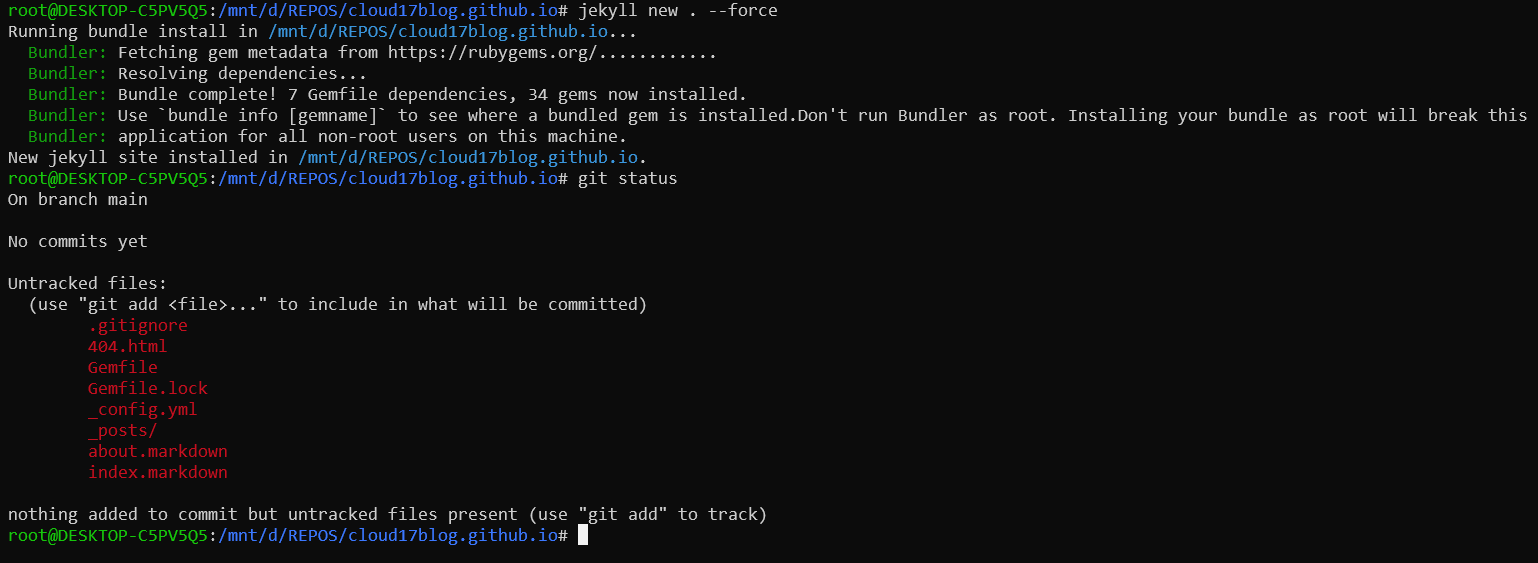
jekyll new . --force
Output and new files created:
4. Build Site Locally and View
I was then able to do a test build of the site (with verbose logging to help debug any errors) by running the following command in the project directory:
bundle exec jekyll build --trace --verbose
You can then deploy the site to the built-in web server:
bundle exec jekyll serve
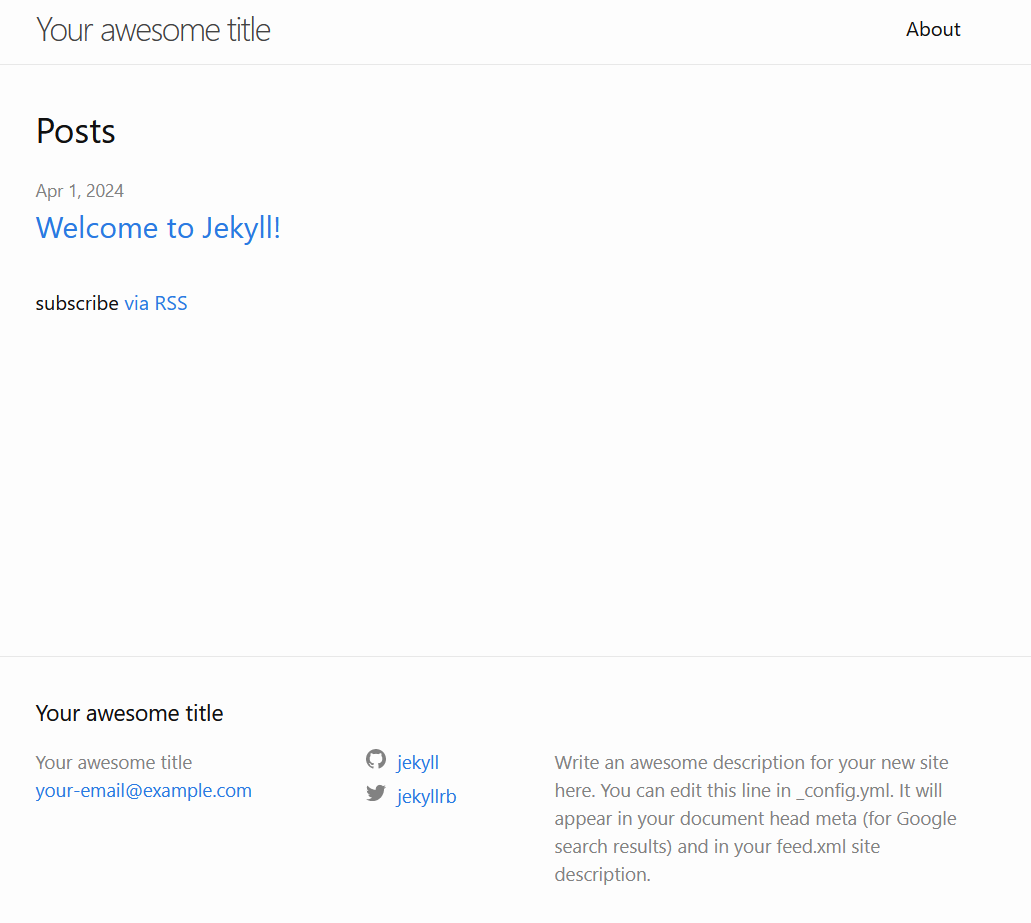
Ignore Dart Sass warnings. Now, you can view your site by navigating to http://localhost:4000 in your web browser and you should see the default Jekyll site:
Customising the Site
I then customised the site quite significantly, changing aspects of the default theme, including forking the newest version of it to my own repository so I could modify it directly rather than override aspects of it, and also to ensure I don’t lose the theme if it becomes no longer available in its current public GitHub repo.
I was then also able to switch to a dark-themed skin, and modify the layout of the pages a little before I started to add content to the site.
1. Forking the Theme
I forked the theme I wanted to use, which was the latest version of the Jekyl Minima theme, from the original repository at https://github.com/jekyll/minima/
2. Using the Forked Theme
I then updated the _config.yml file as follows:
## Update format for version 3.0 of the theme:
author:
  name: Kingston RK
  email: contact@cloud17.co.uk

## Set relevant site settings:
baseurl: "" # the subpath of your site, e.g. /blog - can be left blank for GitHub Pages
url: "https://kingstonrk.github.io/" # the base hostname & protocol for your site, e.g. http://example.com

# Build settings
## Add "jekyll-remote-theme" to the plugins list:
plugins:
  - jekyll-feed
  - jekyll-seo-tag
  - jekyll-remote-theme

## Switch to remote theme and skin:
# theme: minima
remote_theme: kingstonrk/jekyll-minima@master
minima:
  skin: dark
  date_format: "%Y-%m-%d %H:%M"
I also updated the Ruby Gemfile in my repository to use GitHub Pages by commenting out the gem jekyll entry and uncommenting the gem "github-pages", group: :jekyll_plugins entry (both as instructed within the Gemfile), and ran bundle install to update the dependencies:
bundle install
3. Customising the Theme
I then customised the theme by modifying the files in the _layouts and _includes directories, and I added a new (root-level) directory structure of assets/css to store my custom CSS file, named style.scss.
To this file I have added CSS to override specific CSS definitions in the base theme to change the look of the site, including the header colour and size, font styles, sizes and colours, and a few other details of the site’s appearance:
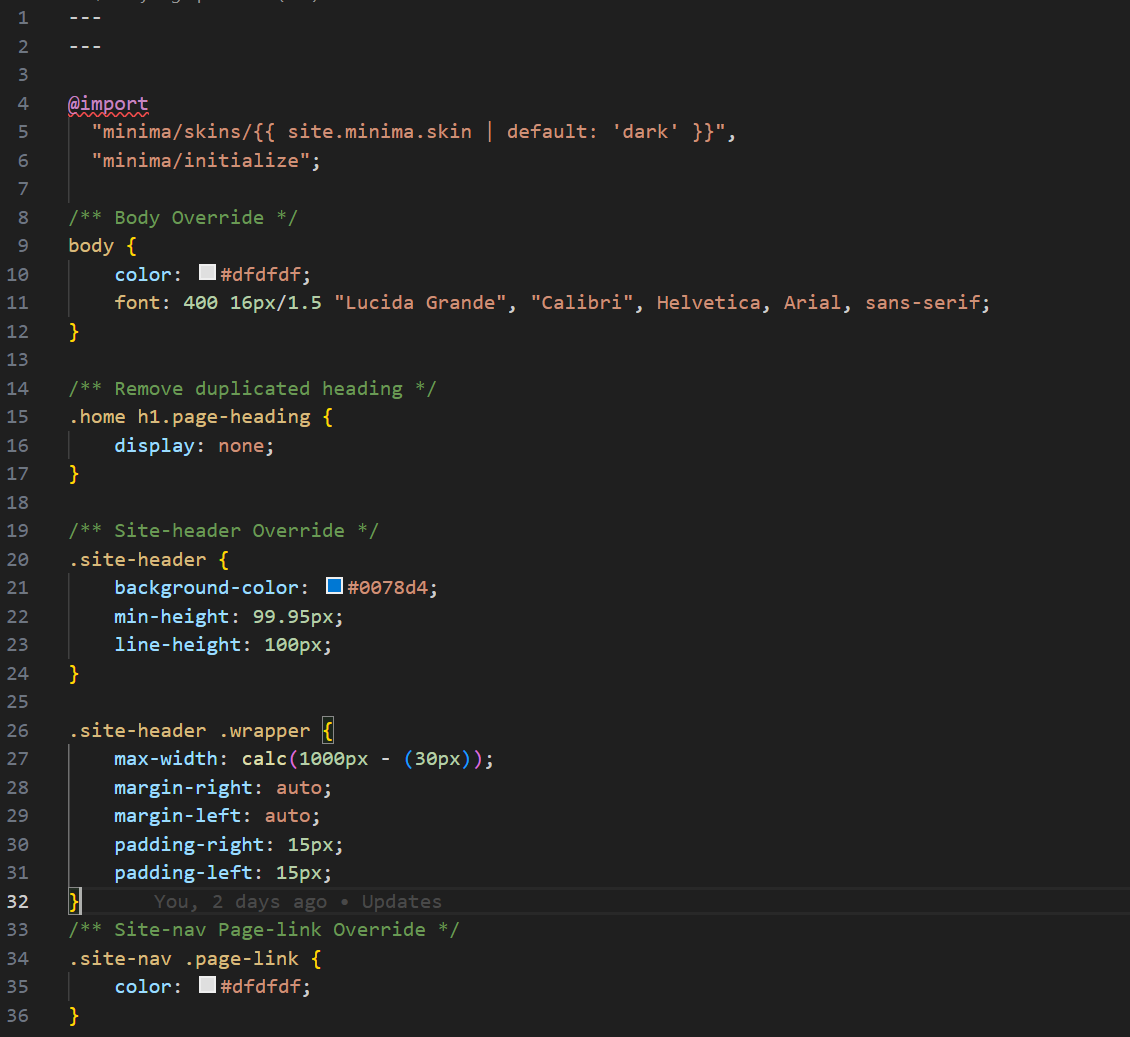
Note: the CSS file is actually a SCSS file, which is an annotated version of CSS that allows for more complex styling and is compiled down to CSS by Jekyll when the site is built. The base theme is imported into this by the @import directive at the top of the file, and overridden styles are then added below.
The assets directory is also used to store images and other files I want to use in the site.
4. Adding Content
I then added content, such as this page(!), to the site by creating new Markdown files in the _posts directory, following the naming convention of YYYY-MM-DD-title.md. These require a set “front matter” be included at the top of the file to define the layout, title, date and categories (directory location) of the post.
Pushing Changes to GitHub
Once I was happy with the appearance of the site, and had written up creating it via this current markdown file, I pushed the changes back to the GitHub repository, waited a couple of seconds for the automated publishing process to complete:
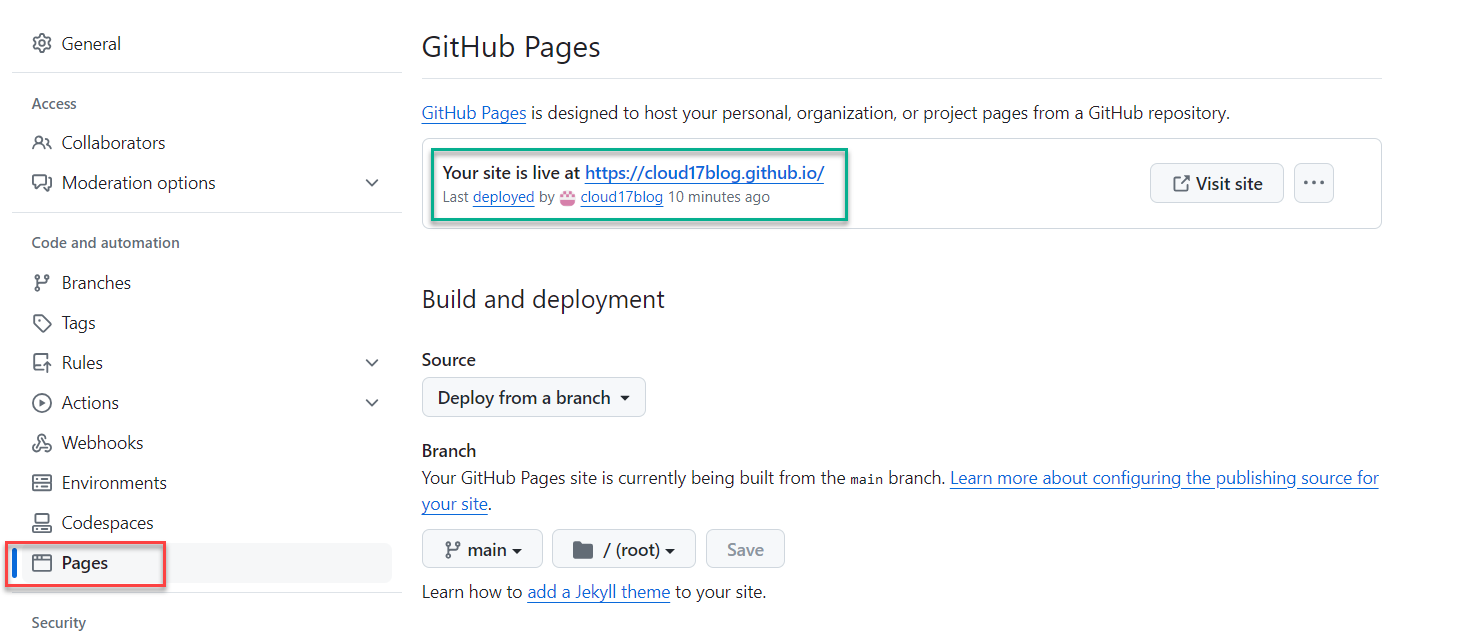
… and was then able to view the live site at https://cloud17blog.github.io/.
Conclusion
I’m quite pleased with the setup and the ease of use of GitHub Pages and Jekyll (it took about two evenings to get this far from knowing nothing about either tool), and I’m looking forward to adding more content as time allows!
To Do
Aside from adding more content and refining some of the page layouts, I have a few things I’d like to do in the future:
- Add a custom domain name
- Add Tags to posts for easier searching (no built-in support for this in the Minima theme, but there are methods to add it)
- Add richer image content